September’s Chores

This post was originally posted HERE.


I’D LIKE TO TELL YOU that September is a restful month. But alas, this is the time to divide and reset perennials, order and plant bulbs,  set up a window garden, and prepare the vacationing houseplants for their return to indoor life. Feeling energetic? Good. You’ll reap great rewards later on if you accomplish the following now:

Perennials.

Bulbs.  Order early, and with purpose. Print out a copy of your order form, and note each bulb’s height, color and location for planting. This way you won’t get caught — like I was, one year — standing in the cold with a bag of hyacinths and not the slightest clue where to plant them. (I always order extra tulips, daffodils, Dutch hyacinths and muscari for advance bloom in the house.) Here are my favorite bulbs for planting indoors and out.

Chrysanthemums. If you don’t already have these in your garden, why not splurge on a few now? They do wonders for the September-to-frost border. Chrysanthemum ‘Helen’ (above), blooms year after year in my Serpentine Garden, just when other perennials are beginning to wane. If you don’t wish to plant the mums, just tuck pots beneath trees and between other plants for temporary decoration.

Iris. Divide and reset crowded clumps, but remember to keep rhizome tops exposed.

Lilies. After flowers fade, cut stems back to the ground. Don’t clip foliage until turns yellow and becomes loose.

Peony. Divide and transplant any poor-blooming old plants or set out new ones this month. They need sun, good drainage and only two to three inches of soil over the crowns.

Roses. Keep deadheading, but stop feeding. Roses need to prepare  themselves for winter dormancy — not new growth.

Vegetables

Broccoli. If you’d like to freeze your autumn harvest,  follow these directions.

Cabbage. Are slugs eating the leaves? Stop this destruction by spreading  iron phosphate (sold as “Sluggo”) beneath the plants. By all accounts, iron phosphate is completely harmless to people and pets.

Carrots. Harvest what you need; leave the rest in the ground over winter. At the first spring thaw you’ll have some of the sweetest treats in the world. I speak from experience.
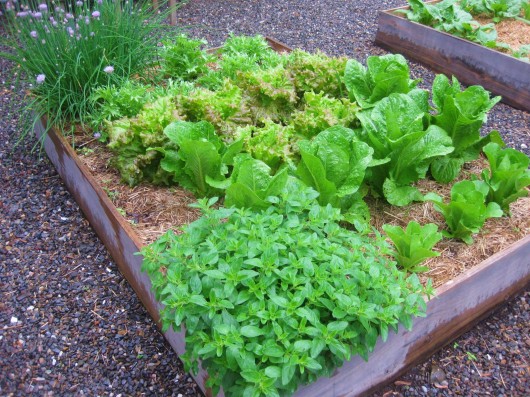
Salad Greens. Continue sowing until October 1. If a sudden hard frost is predicted, and you don’t have a proper row-cover, just throw a sheet over the crop.

Onions. Harvest, cure and store according to these directions.

Potatoes. Although my potato vines have died back, I certainly won’t harvest the crop until really cool weather arrives (usually the end of October). This way my cellar will be cold, too, and thus better suited for potato-storage. Tubers only keep well in quarters which are dark, humid, and chilly (35-40 degrees F.). How I plant, grow, harvest, and store potatoes.

Tomatoes. To avoid the ravages of late blight, frost, or a severe storm, pick mature fruits while they are still green, and let them ripen in paper bags indoors. I find that a banana placed in each bag really speeds things up.

Herbs.  Not sure how to freeze or store your garden’s bounty? I handle matters this way.

 Indoor Gardening

Vacationing Houseplants.  Gradually condition these to indoor life before nights get cold. By Labor Day, I move mine to the porch where there is less light than in the open and they stay there for a week or two. Prior to their coming in, pots should be scrubbed, foliage cleansed with a firm blast of water, and both pot and plant sprayed with a good insecticide (I use House & Garden Raid). This way, plants will be in a clean condition and no pest epidemics will start.  Indoors, keep windows open day and night to provide plenty of fresh air through the first weeks. Then there should be a minimum of leaf-drop and general discontent with the home environment.

Design a Window Garden. Houseplants look their best, and are far easier to maintain, when you display them not just on a window sill, but in a real window garden. A window garden is an ordinary window that’s been outfitted with a broad sill and glass shelves. It takes neither money nor skill to create such decorative quarters for plants. Here’s proof.

Petunias, Wax Begonias, Impatiens. Take cuttings now, and root them in pots of good soil. Brought indoors before frost, these tender annuals will provide cheerful bloom during the dark winter months.

Amaryllis. Induce dormancy the first week in September. To do this, lay the pot on its side and let the soil dry out. Remove the foliage after it turns yellow and becomes loose, and then bring the plant indoors to a dark and cool place. Give water not more than once every three weeks during the winter rest. Need more details? See my Amaryllis Growing Guide.

Is my monthly list of chores helpful to you in some small way?   Perhaps you can let me know by leaving a comment.

Dividing Hostas

Hostas

Dividing Hostas is best to be done in late summer during the month of August, or early September. If you divide your hostas in the summer, be sure to keep them well watered for a few weeks after to help absorb the shock of being transplanted. It is also important to allow for three to four weeks for the hostas to become established before the soil freezes.


You can tell when your hosztas need to be divided when you notice that they get too crowded and the center of the bunch begins to die. Faster growing varieties should be divided every three to four years to keep the plants their healthiest. Slower growing varieties may need longer.

If your hostas aren’t too large, dig out the entire plant. To do this, you can dig around the bunch of plants in a circle, then use your shovel like a lever to lift it out of the ground. Once the plant is dug up, you should be able to see that the bunch is actually made of many individual plants. Be careful as you break the bunch into sections made up of at least three sets of shoots.


If the hostas are too large to lift out of the ground, use your shovel to cut through the bunch into sections. Carefully dig out each group and replant them in the ground at the same depth they were growing before. As mentioned before, be sure that they are watered well.


Here’s a helpful hint: Experienced gardeners have found that it is easiest to divide the hostas using a garden fork or a flat spade.


Happy Hosta-Dividing!

Summer’s End

Summer_39_s_end

August is coming to an end, and with it marks the end of summer. The kids are going back to school, teachers are setting up their classrooms and the summer heat will be turning into the lovely cool weather of autumn.


With Summer’s end just around the corner, it is important that you prepare for the change of weather and prepare your garden and landscaping so you can enjoy the fruits of your labor (pun not intended) for as long as possible.


Save Seeds

Saving the seeds from your annuals is always a great idea. Most annual seeds can be gathered, placed in paper envelopes, labeled and stored in a cool, dry, dark place until they are needed in the spring. All annual ornamental grasses are perfect for seed saving (YOU CAN SEE OUR ARTICLE ON HOW TO USE ORNAMENTAL GRASSES HERE).


The end of summer is the time to watch for ripening seedpods so they can be dried for winter bouquets. The flowers sense the approaching cool weather and often burst with the last round of bloom. The colors will seem brighter against the sharp blue skies and crisp air.


The Flowers of Fall

The days will grow shorter and you will find yourself amazed at the strength of some of your annuals. The leaves of some straw flowers may shrivel with the mounting cold, but their bright orange, red, yellow or white petals will resist the frost and will continue to glow in the morning sun. The Fall also brings out the magnificent colours of cabbage, kale and other plants that need the nip of frost not only to grow but to make their leaves shimmer in the light. Lastly, there are the pansies. These will bloom all winter long where the winters are mild.

August’s To-Do List

august_to_do

The month of August is flying by and the end of summer is just around the corner! To prepare for the back to school months, and the upcoming fall, here are some to-dos to keep your landscaping and gardening up to date!


  • Planning is always the fun part right? Start planning by ordering bulbs. Another idea is to take notes and draw out future garden plans.
  • If rain is lacking in your area, be sure to water your plants down to the roots.
  • August creates the perfect climate for weeds to overtake EVERYTHING! Be sure to keep up.
  • Mow your garden to maintain the three inch rule! The end of your month is a great time to fertilize your lawn.
  • Late August is a perfect time to plant grass!
  • Stay on top of the pests! When there is one, there is many more.
  • It’s a great time to put up hummingbird feeder if you haven’t already!
  • Prune your summer flowering shrubs after they’re done blooming. While you’re at it, be sure to prune out any deadwood from your shrubs and trees.
  • To get a jump on colour, plant your late season annuals!
  • Lastly, be sure to clean up and organize your garage, potting or garden sheds. It’ll be great to be nice and organized for the fall.

The Eleven DON’Ts of August

donts

  1. Don’t cut your grass any shorter than three inches.
  2. Don’t prune unless it is absolutely necessary. Restrict trimming to removing a few stray shoots.
  3. Don’t apply nitrogen fertilizer (manure, straw, or sawdust) to shrubs.
  4. Don’t forget to remove dead foliage as it will keep the plants blooming until frost!
  5. Don’t forget to check your hemlock trees for signs of woolly adegid infestations.
  6. Don’t neglect your beautiful container gardens! Be sure to feed them worm castings or granulated organic fertilizer.
  7. Don’t forget to trim plants back if they have become overgrown.
  8. Don’t let the heat get to you! Be sure to think about planting your fall crops.
  9. Don’t drop the ball on insect control and watering.
  10. Don’t stop removing old foliage from the garden and when you remove diseased plants don’t put them in the compost heap.
  11. Don’t forget to harvest your basil when the plants begin to flower. Be sure to cut the stems back to get a new growth.

How to Mow Like A Pro

MowPro

There is nothing more spectacular than a freshly cut lawn with clean, straight tire lines. It is mowing season, and with the grass growing faster than I can keep it cut, I thought it would be a great idea to share some tips on how to Mow like a Pro!

Step One: Be sure to use a sharp blade. Sharpen it as often as you can, but at least once or twice a year. A sharp blade will give you clean cut that looks good and keeps your grass feeling and looking healthy!

Step Two: Pick up the trash. Clear your lawn from any obstacles to prevent from mowing anything but your lawn. Running over your trash or rocks is unsafe and will dull your blade. Oh, and you’ll have a big mess to clean up as well!

Step Three: Mow around the edges of your lawn first. Do this not once, but twice and then you will have enough room to turn the mower around as you mow the middle.

Step Four: Mow in straight lines. This will make your lawn look like it mowed professionally. Mow parallel to the sidewalk or house. Did you know that when you mow, the wheels leave lines in the grass? These lines will make your lawn nice and clean if done correctly.

Step Five: Overlap your cut lines! Overlap your cut lines by one or two inches. This will make sure that all the grass has a chance to get cut each week.

Step Six: Trim the Edges. Use a trimmer and fix up any grass that didn’t get cut by the mower. This will ensure that the grass all grows at the same height.

Step Seven: Alternate your mowing patterns every week. Switch up your patterns so that your lawn gets cut evenly throughout the month. You want to avoid your lawn getting permanent stripes in the grass from the mower wheels rolling in the exact same places each week.

Step Eight: Don’t go too long between cuts! The longer you wait to mow, the longer it will take to get the job done when you finally get around to it. It could also mean having to mow twice, once at a higher setting and then again on a lower setting.

Step Nine: Don’t cut too short! Cutting your grass too short will damage the lawn and cause the lawn to dry out. It can also damage your blade by cutting into the soil.

June’s To-Do List!

June_39_s_To_Do_List

The month of June is halfway gone already and it seems like it just started! Here’s your June to-do list to help you makeup for list time!


Fruit & Vegetable Gardens

  • Plant your fruit and vegetables that love warm weather (ie. corn, peppers, zucchini and squash, and basil).
  • By planting your bush beans, summer lettuce and corn in intervals will spread out the harvest over several weeks.
  • Harvest your beets, carrots, lettuce and chard.
  • Keep your tomatoes staked, pruning the lower branches as needed to keep air flowing and discourage blights. You can also stake other needed plants including peppers and brussels sprouts.
  • Hill up potatoes two – three times before letting them mature.
  • Sow your seeds for your fall garden (ie. Brussels sprouts, long-maturing cabbage, rutabagas and turnips).
  • Watch your fruit trees for any insects or diseases, and treat as needed.
  • Thin your apples, pears and peaches when the fruit is the size of a nickel.
  • Train your grapevines as needed and prune as needed.
  • Harvest your strawberries and other berries as they ripen.
  • Keep your garden beds weed free.


Flower Gardens

  • Fertilize your roses and dahlias.
  • Stake tall flowers as needed before they get too big and fall over.
  • Divide you early blooming perennials as needed. If you do it this month, make sure to water it well until they’re established.
  • Trim and remove any dying foliage from your spring bulbs. Now would be the time to move any that you would like.
  • Remove seed pods from your rhododendrons and azaleas and prune your other spring blooming shrubs.
  • Watch for signs of mildew, black spots or rust and treat if necessary.


Other Chores

  • Fertilize your lawn for a second time if needed. Keep watering and mowing as well.
  • Put out bait for slugs and snails if that is a potential issue.
  • Trim your hedges mid-month.
  • Start your watering cycle, soaking beds with soakers or drip systems every five days. Raised beds every four to five days in warm, dry weather.

June Gardening and Yard Work

As June arrives, so does the warmer weather! This usually marks the end of the planting season, but it also marks the beginning of some pretty great clearance sales! Be sure to check out your local gardening stores. If you purchase new plants, be sure to add organic matter to your soil so they have a leg up after their late start, and will improve your ground over time as well!


Tend_To_Your_Flowers(1)


Unless you experience unseasonably cold, moist conditions, your spring bulbs should begin to yellow and will pull out of the ground with no resistance. Add these leaves to your compost pile but make sure not to remove the leaves before they are ready or your bulbs will not perform next year.


If you haven’t already began mapping out your garden’s spring bulb display, now is the perfect time to start! By doing this you will know which bulbs you want to purchase this fall.


Watch for signs of pests and weeds in your garden. If you catch them early enough you can usually keep them from becoming an epidemic that ruins your yard. Here’s some things to look out for:

  • Watch your tomatoes for spotted leaves. If they develop leaves pull them off the plant and throw them in the trash. This will stop diseases from developing.
  • Check your azalea’s for black spots on the bottoms. Lacebugs can become a very big problem but you wont notice the damage until August or even September!
  • Watch out for standing water in your garden as they can become breeding grounds for mosquitoes.


As the temperatures grow, so will your grass! Avoid allowing it grow too long; it is best to cut less than one-third of the total length off at one time. If grubs were a problem last year then make sure you treat your lawn end of May or early June. Make sure to water your lawn deeply during dry spells. It is best to let the water soak into the soil rather than only watering enough to make the top of the ground moist.

How To Kill Weeds

Capture

Here are some ways to kill weeds using things you might have just laying around your house!


  1. Newspaper: By laying down newspaper, it will block out the sunlight and oxygen from reaching the soil which will in turn smother the weeds that have already sprouted and prevent new plants from taking root. To do this, put down ten sheet layers of newspaper, wet it to keep it in place and cover it in an inch or two of mulch. If the weeds begin to grow in the mulch then you will need to add more layers which will eventually decompose and nourish the soil.
  2. Old shower curtains and carpet samples: These potentially useless items can be spread along garden paths or between rows of plants and cover with mulch to help keep weeds from sprouting.
  3. Vinegar: The acidity in the vinegar will suck the life out of the plants leaves. This method will be more effective when sprayed on young plants with immature roots, although it will simply just roll off weeds that have waxy leaves such as pennywort and thistle. Make sure you cover your flowers and other desirable plants before you spray, as vinegar will kill them as well. Do not allow it to spray or splatter on to your fruit and vegetables.
  4. Vodka: Although the verdict is not in yet if the weeds fall down because they are dead or simply drunk, one ounce of vodka with two cups of water and a couple drops of dish soap will dry out your weeds that live in the sun. It however does not work on shade-loving weeds. Just as I stated previously, protect your flowers and other desirable plants as this will dry them out too!
  5. Soap: Soap is a great way to break down waxy or hairy weed surfaces, making them vulnerable. By adding a few drops of liquid dish soap to vinegar or vodka spray, it will help keep the solution on the leaves. The soap also leaves a shiny look which will help you keep track of what you sprayed! T
  6. Boiling water: Do you have left over boiling water after making a cup of tea or coffee? Take the kettle outside and pour the boiling water on the weeds to burn them up! This is a great way to whack off driveway and walkway weeds because the boiling water will run off before it reaches your desirable plants!